6/20/22

How to Deploy Rancher Harvester Cluster on Bare Metal Cloud Instance

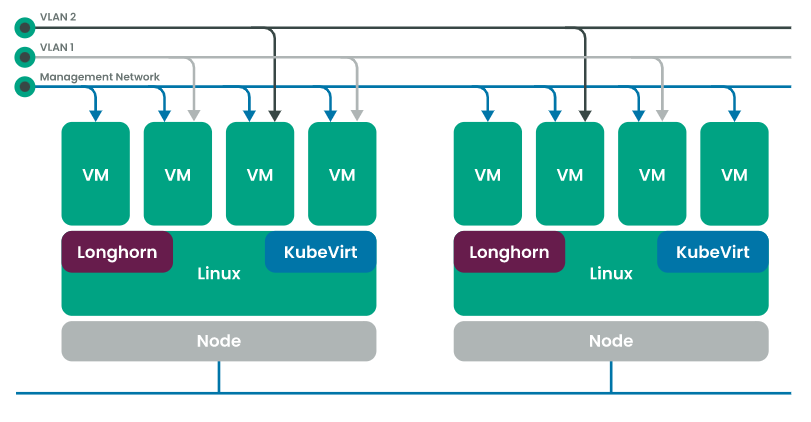
Rancher Harvester is an open-source hyper-converged infrastructure platform designed to run modern cloud-native workloads on bare metal servers and it is completely open-source and free to use. Traditional Type 1 Hypervisors are complicated to set up on bare-metal hardware and it usually involves many storages, network, and other peripheral device configurations. We will cover on deploying rancher harvester on bare metal cloud instance and setting up your first virtual machine in rancher harvester. I am going to use vultr as a bare-metal cloud provider (Get $100 free vultr credit to setup your harvester cluster), you can use any cloud provider or you can even use your HomeLab/Self Hosted environments.
Rancher Harvester is built on top of Kubernetes using
  • Longhorn - lightweight, reliable, and easy-to-use distributed block storage system for Kubernetes.
  • Elemental for openSUSE Leap 15.3 - Linux distribution designed to remove as much OS maintenance as possible in a Kubernetes cluster.
  • KubeVirt - virtual machine management add-on for Kubernetes which leverages KVM and libvirt to allow running virtual machines inside of Kubernetes cluster.

Installation

Login to your vultr management console and click on deploy a new server.

Vultr Management Console


Select bare metal cloud instance, select server location, select initial pre-installed OS, and select server size and disk configuration. You can enable IPv6  (optional) and add an SSH key. Give hostname to your instance. Click on deploy.

Rancher Harvester Vultr Bare Metal

It will take a couple of minutes to provision and spin up your new server instance, So please be patient. I have selected a 2 * 240 GB SSD instance. So we will get two disk partitions /dev/sda and /dev/sdb. In /dev/sda (this has pre-installed Ubuntu 22.04 LTS OS running on it) and /dev/sdb which is formatted empty drive. 

Rancher Harvester Vultr Instance Up

Click on the server instance, and you will find the server IP, username, and password. ssh into the server instance using the server username and server password which is given in the vultr server management console.

Vultr ssh to console


Run the below commands in your terminal. This will download the rancher harvester ISO image from Harvester Github Release and it will mount the ISO image as a harvester installer to our empty /dev/sdb drive and finally reboots the server. Your ssh terminal should get disconnected and you can close the terminal.

sudo apt update
wget https://releases.rancher.com/harvester/v1.0.2/harvester-v1.0.2-amd64.iso
umount /dev/sdb1
dd bs=1M conv=fdatasync if=./harvester-v1.0.2-amd64.iso of=/dev/sdb
reboot

While the server boots up, click on View Console (right top monitor icon) in vultr management console. Next when seeing the below screen start hitting the F11 key on your keyboard to take you to the boot menu screen.

Vultr Boot Menu

You should see boot menu screen like below. This is the place where you can enter boot setup and change the boot order.

Vultr Boot Menu Options

Select UEFI OS ( P3: Intel SSDSC2BB240G7 ) and press enter. (Basically, it means you are selecting to boot from /dev/sdb drive which has a harvester installer ISO image mounted on it)

Rancher Harvester Installation

Select Harvester Installer v1.0.2 and press enter. It will take a few minutes to boot the kernel and it should show you the below screen.

Rancher Harvester Installation New cluster

Select Create new harvester cluster. You can select join the existing harvester cluster if you already have the harvester cluster up and running. 

Rancher Harvester Installation Partitions

Next, you get the option to choose the drive to install Harvester. We select sda 223.6G. Remember, We have two disk partitions /dev/sda and /dev/sdb. In /dev/sda (this has pre-installed Ubuntu 22.04 LTS OS running on it) and /dev/sdb we have a harvester installer (currently we booted from this). We are going to erase and remove Ubuntu OS from /dev/sda and install Harvester v1.0.4 in /dev/sda.

Rancher Harvester Installation Configuration

Enter the hostname and select Management NIC. You can also select Bond Mode and IPv4 method. I will leave it with default values. Press enter to continue. It will apply the network configurations.

Rancher Harvester Installation Configuration

It will ask for configuring DNS servers. I will leave it empty and press enter. (Optional step)

Rancher Harvester Installation Configuration

Next, it will ask for configuring Virtual Private IP. I am giving it as a static method and 172.168.0.102. This is an important and mandatory step and make sure this is done right. The VIP IP address you can use anything that you want to use to expose your application. 

Rancher Harvester Installation Configuration

Enter your cluster token, this will be used when you are joining the existing harvester cluster.

Rancher Harvester Installation Configuration

Enter the password and confirm the password. Press enter to continue.

Rancher Harvester Installation Configuration

Configuring NTP server. Use the default value and press enter.

Rancher Harvester Installation Configuration

Configuring Proxy. Leave it empty and press enter. 

Rancher Harvester Installation Configuration

Configuring SSH/import SSH key. You can import it if you have one or leave it empty and press enter.

Rancher Harvester Installation Configuration

Harvester remote configuration - You can add it if you have one or leave it empty and press enter.

Rancher Harvester Installation Summary


Finally, it gives a summary and it will ask whether you want to erase and install the harvester. Select yes and press enter.

Rancher Harvester Installation


Installation should start. It will show you the installation progress. It will take a couple of minutes to complete the installation and finally, it automatically reboots the server. 

Vultr Boot Menu

When the server boots up, press the F11 key on your keyboard to take you to the boot menu screen and this time we are going to select UEFI OS ( P2: Intel SSDSC2BB240G7 ) and press enter. (Basically, it means you are selecting to boot from /dev/sda drive which has a harvester installed)

Rancher Harvester Boot

Select Harvester v1.0.4 and press enter. You will be taken to the next screen which has the Rancher Harvester Management URL, IP address, and cluster state.  Please be patient, it will initially show cluster state as Unavailable, Not Ready, Setting Up, etc. After giving a couple of minutes it should show you the below screen.

Rancher Harvester Management Console


Congratulations, your Rancher Harvester cluster is Up. You can go to vultr public IP (vultr management console) from the new browser tab and you should be able to setup rancher harvester UCM first-time login screen. Set your new password and click on continue.

Rancher Harvester Login Setup


Rancher Harvester UCM

Wrapping Up

Thanks and congratulations on setting up your new harvester infrastructure. If you encountered any issues while setting up the cluster, please comment below. I have covered only the single node harvester setup process and will cover how to join existing harvester nodes to form a harvester cluster, Virtual Machine deployment, and Virtual Machine migration to a new harvester host/node in my upcoming posts. So stay tuned and happy developing infrastructure.  

1/26/17

Journey to Google's Go (Golang) Programming Tutorial Series

Go or Golang is a general-purpose programming language and an open source programming language that makes it easy to build simple, reliable, and efficient software. It was created at Google by Robert Griesemer, Rob Pike, and Ken Thompson in 2007. In this post we'll be learning the Features of Go,What it is good for ?, What companies are using it and some Success Stories.


Journey to Google's Go (Golang) Programming Tutorial Series

What are the features of Go (Golang) ?
  • Fast compilation, statically typed strict programming language
  • Concurrent programming language 
  • Scalable to large systems 
  • Has good garbage collection
  • Function can return multiple values 
  • Standardized by De facto
  • Syntax is mostly similar to C family with some richness taken from python,c++,pascal etc
  • It is object oriented with methods & interfaces but without type inheritance like we have in Java
What is Golang good for ?

Go (Golang) is good for server-side applications to build high scalable web applications,It is also used for Machine learning, Natural language processing,Artificial Intelligence,Internet of Things,data visualization etc

Should I learn Golang for building Web Applications ? 

I would like to say "Big YES", why ? Any web application that you going to build should have ability to handle good decent amount of traffic,should have good code readability,should utilize all available resources and moreover it should be efficient and fast to reduce your overall cost of the application. Agree with me ? 

What companies are already using Go (Golang) in production ?
  • Google
  • Dropbox
  • Cloudflare
  • Sendgrid 
  • Soundcloud
What are some success stories of using Golang in production ?

What are some good IDE's or plugins to start with ?


Lets take very basic Hello World Example in Go:


package main

import "fmt"

func main() {
 fmt.Println("Hello World, Journey to Google's Go (Golang) Programming Tutorial Series ")
}


Output :


Hello World, Journey to Google's Go (Golang) Programming Tutorial Series 

So just to keep it simple and short, this is just an introduction to my golang tutorial series, In my coming post, we'll be seeing more of problem and its solution (Recipe or How-To) type tutorials using Go (Golang) programming language. Thanks and have a nice day


3/11/16

Java Program to Implement Breadth First Search (BFS)

Breadth-first search (BFS) is an algorithm for searching or traversing the tree or graph.BFS algorithm was invented by E.F. Moore in the late 1950s.Breadth First Search (BFS) Algorithm in detail .It is Similar to DFS Algorithm but we are using single source and traversing all possible vertices from that single source breadth wise .We have used cal_BFS() to check whether we can traverse or not . If yes print them if not just add them to the stack or queue . Remove each element from stack then check if any remaining elements is having direct path from source node. if yes print them if not add them to other stack or queue .Finally print all remaining nodes from the stack or queue. 


Java Program to Implement Breadth First Search (BFS)


Let us take a sample example for Breadth-first Search (BFS) Algorithm.
Java Program to Implement Breadth First Search Algorithm


import java.util.*;
public class BFS 
{
 public boolean visited[] = new boolean[50];
 public int q[] = new int[50];
 public int m[][] =new int[50][50];
 public int nodes;
 
 public void calc_BFS(int source)
 {
  int i,r=-1,f=0;
  for(i=1;i<=nodes;i++)
   if(m[source][i]>0 && !visited[i])
    q[++r]=i;
  if(f<=r)
  {
   visited[q[f]]=true;
   calc_BFS(q[f++]);
  } 
 }
 
public static void main(String args[])
 {
  int source,i,j,k=1;
  int stack[]=new int[10];
  int s[]=new int[10];
  BFS b = new BFS();
  Scanner in = new Scanner(System.in);
  System.out.println("Enter the Number of Nodes \n");
  b.nodes = in.nextInt();
  
    for(i=1;i<=b.nodes;i++)
    {
            b.visited[i]=false;
   b.q[i]=0; 
    }
   System.out.println("Enter the Weights for \t"+b.nodes+"Nodes Below \n");
 for(i=1;i<=b.nodes;i++)
   for(j=1;j<=b.nodes;j++) 
   {
   System.out.println("Enter the Weights for \t"+i+"th row \t"+j+"th Column :");
   b.m[i][j] = in.nextInt();
   }
  System.out.println("Enter the Source Vertex :\n");
  source=in.nextInt();
  // Calculate the BFS
  b.calc_BFS(source);
  // Display nodes that are directly reachable from source 
  System.out.println("The Nodes that can be reachable from \t"+source+"\t to all other vertices are : \n");
        for(i=1;i<=b.nodes;i++)
          if(b.visited[i])
   System.out.print("\t"+i+"\t");
    else
    { 
   stack[k++]=i;
    }
     // pop out the remaining elements from the stack which are directly reachable from source
    k=k-1;j=1;
    int ele,f=0;
    while(k>0)
    {
     //get element from stack and check if there is any direct path from source to that element 
     ele=stack[k--];
     for(i=1;i<=b.nodes;i++)
     {
      if(ele==i && b.m[1][i]==1)
      {
       System.out.print("\t"+ele+"\t");
       f=1;
       break;
      } 
      else
       f=0;
     } 
     // if no direct path from source ,collect them and store it in array S .
     if(f==0)
      s[j++]=ele;
     
    }
    k=j-1;
    j=1;
    // pop out the remaining elements from the stack even though they are not reachable directly from source
    while(j<=k)
    {
     System.out.print("\t"+s[j++]+"\t");
    }   
 } 
}

Please Click and Drag from the beginning to End of the above Source code for Selection and Copying.

Adjacency Matrix representation:

    a b c d e f
a  0 0 1 1 1 0
b  0 0 0 0 1 1
c  1 0 0 1 0 1
d  1 0 1 0 0 0
e  1 1 0 0 0 1
f  0 1 1 0 1 0

Sample Output for the above graph is :

javac BFS.java
java BFS

Enter the Number of Nodes : 6
Enter the Weights for   6 Nodes Below :

Enter the Weights for   1th row         1th Column : 0
Enter the Weights for   1th row         2th Column : 0
Enter the Weights for   1th row         3th Column : 1
Enter the Weights for   1th row         4th Column : 1
Enter the Weights for   1th row         5th Column : 1
Enter the Weights for   1th row         6th Column : 0

Enter the Weights for   2th row         1th Column : 0
Enter the Weights for   2th row         2th Column : 0
Enter the Weights for   2th row         3th Column : 0
Enter the Weights for   2th row         4th Column : 0
Enter the Weights for   2th row         5th Column : 1
Enter the Weights for   2th row         6th Column : 1

Enter the Weights for   3th row         1th Column : 1
Enter the Weights for   3th row         2th Column : 0
Enter the Weights for   3th row         3th Column : 0
Enter the Weights for   3th row         4th Column : 1
Enter the Weights for   3th row         5th Column : 0
Enter the Weights for   3th row         6th Column : 1

Enter the Weights for   4th row         1th Column : 1
Enter the Weights for   4th row         2th Column : 0
Enter the Weights for   4th row         3th Column : 1
Enter the Weights for   4th row         4th Column : 0
Enter the Weights for   4th row         5th Column : 0
Enter the Weights for   4th row         6th Column : 0

Enter the Weights for   5th row         1th Column : 1
Enter the Weights for   5th row         2th Column : 1
Enter the Weights for   5th row         3th Column : 0
Enter the Weights for   5th row         4th Column : 0
Enter the Weights for   5th row         5th Column : 0
Enter the Weights for   5th row         6th Column : 1

Enter the Weights for   6th row         1th Column : 0
Enter the Weights for   6th row         2th Column : 1
Enter the Weights for   6th row         3th Column : 1
Enter the Weights for   6th row         4th Column : 0
Enter the Weights for   6th row         5th Column : 1
Enter the Weights for   6th row         6th Column : 0

Enter the Source Vertex : 1

The Nodes that can be reachable from    1   to all other vertices are :

        1               3               4               5         6        2


If you have any Comments please let me know . Enjoy Coding .

Also Read :  Java Program to Implement Simple PageRank Algorithm

2/28/16

How to Create Simple Notepad with Save & Clear Option | PHP

To create a simple Notepad Application using PHP we need 3 main things : Connect page, Index page and Save page . The Connect page is used to create connection to your backend database .The Index page is used to interact with the front end user and the Save page actually saves your content or put your text content from front end Notepad to backend database . We will also use AJAX and Jquery for displaying the instant error messages .

How to Create Simple Notepad with Save & Clear Option | PHP


View demo   Find this Project on Github

Connect.php


<?php
$HOST='localhost';
$USERNAME ='root';
$PASSWORD='';
$DATABASE='notepad';

// Create connection
$connection = new mysqli($HOST, $USERNAME,$PASSWORD,$DATABASE);

// Check connection
if ($connection->connect_error) {
    die("Connection failed: ".$connection->connect_error);
} 

?>


The host in this example is Local Host but you can change this and point to your custom domain address.
Username and Password are used to get access to the MYSQL database .
I have used notepad as name of the MySQL Database .


Index.php


<html>
<head>
<script type="text/javascript" src="jquery.min.js"></script>
<script type="text/javascript">
    $(function() {
  $("#save").click(function() {
  var filename = $("#filename").val();
  var textarea = $("#textarea").val();
  var formdata = 'filename='+ filename + '&textarea=' + textarea;

if(filename=='' || textarea=='')
{
  $('.onfailure').fadeIn("fast").delay(2000).fadeOut("fast");
}
else
{
   $.ajax({
    type: "POST",
    url: "save.php",
    data: formdata,
    success: function(){
    $('.onsuccess').fadeIn("fast").delay(2000).fadeOut("fast");
    }
  });
}
return false;
});
});
function eraseText() {
    document.getElementById("textarea").value = "";
 $('.onclear').fadeIn("fast").delay(2000).fadeOut("fast");
}
    </script>
  </head>
<style>
#outer-wrapper {
  padding:0px 50px;
}
#inner-wrapper {
 padding: 50px 0px 20px 0px;
}
#options {
 padding:20px 0px 20px 0px;
}
#status span{
 padding:20px 0px 20px 50px;
}
</style>
</head>
<body>
<div id="outer-wrapper">
<form id="notepad" >
<div id="inner-wrapper"><input type="text" id="filename" name="filename" placeholder="Enter your Filename ..." value="" >.txt</input></div>
<textarea id="textarea" rows="20" cols="100" name="textarea" placeholder="Type your text here ..." value="" ></textarea>
</form>
<div id="options">
<input type="button" id="save" name="save"  value="Save the file " ></input> | <input type="button" id="clear" onclick="javascript:eraseText();" value="Clear"></input>
</div>
</div>
<div id="status">
<span class="onsuccess" style="display:none"> File has been Saved Successfully. </span>
<span class="onfailure" style="display:none"> Text Area or Filename cannot be left Blank.  </span>
<span class="onclear" style="display:none"> Text Area has been Cleared.  </span>
</div>
</body>
</html>


I have used Jquery On Click function.So On click of Save button ,get the filename and Text Area value and store it in 2 variables.Then validate these two data (check if it is empty) , if it is empty display error message using Jquery fadeIn() and fadeOut() function or else use AJAX post request to send the form data to Save.php . Dont forget to add or link to Jquery library file.

Save.php


<?php
include('connect.php');
$filename="";
$textarea="";
if($_POST)
{
$filename=$_POST['filename'].".txt";
$filename = str_replace(' ', '_',$filename);
$textarea=$_POST['textarea'];
$query = "update notepad_table set filename='".$filename."',textarea='".$textarea."' where id=1 ;";
$result = mysqli_query($connection,$query);
}else { }

?>


Get the Filename and Text Area from Index.php,Store it in 2 variables and finally update the MYSQL Database notepad table using Connect.php connection.All Done .Any Questions Please comment below.

Also Read :  Java Program to Implement Simple PageRank Algorithm

12/14/15

Java Program to Implement Simple PageRank Algorithm

When you go and type some keywords in Google Search Engine a list of Web Pages will be displayed ,but how does the search engine know which page to be shown first to the user ? To solve this problem a  algorithm called PageRank was developed at Stanford university by Larry Page and Sergey Brin in 1996.The PageRank Algorithm uses probabilistic distribution to calculate rank of a Web page and using this rank display the search results to the user. The Pagerank is recalculated every time  the search engine crawls the web.

Java Program to Implement Simple PageRank Algorithm

The original Page Rank algorithm which was described by Larry Page and Sergey Brin is :

PR(A) = (1-d) + d (PR(W1)/C(W1) + ... + PR(Wn)/C(Wn))

Where :
PR(A) – Page Rank of page A
PR(Wi) – Page Rank of pages Wi which link to page A
C(Wi) - number of outbound links on page Wi
d - damping factor which can be set between 0 and 1

To calculate PageRank for the n Webpages ,First we initialise all Webpages with equal page rank of 1/n each.Then Step by Step we calculate Page Rank for each Webpage one after the other.


Let us take one example :

Java Program to Implement Simple PageRank Algorithm


There are 5 Web pages represented by Nodes A, B, C , D, E .The hyperlink from each webpage to the other is represented by the arrow head.
Java Program to Implement Simple PageRank Algorithm

At 0th Step we have all Webpages PageRank values 0.2 that is 1/5 (1/n) . To get PageRank of Webpage A ,consider all the incoming links to A .So we have 1/4th the Page Rank of C is pointed to A. So it will be (1/5)*(1/4) which is (1/20) or 0.05 the Page Rank of A. 

Similarly the Page Rank of B will be  (1/5)*(1/4)+(1/5)*(1/1) which is (5/20) or 0.25 because A's PageRank value is 1/5 or 0.2 from Step 0 . Even though we got 0.05 of A's PageRank in Step 1 we are considering 0.05 when we are Calculating Page Rank of B in Step 2.

The general rule is --> we consider (N-1)th step values when we are calculating the Page Rank values for Nth Step . Not Clear ? Please Comment it below .

In Similar way we calculate all the Page Rank Values and Sort them to Get the Most important Webpage to be displayed in the Search Results .

Java Program to Implement Simple PageRank Algorithm
Edith Law - lecture12


Java Code for Page Rank Algorithm :


import java.util.*;
import java.io.*;
public class PageRank {

 public int path[][] = new int[10][10];
 public double pagerank[] = new double[10];

 public void calc(double totalNodes) {

  double InitialPageRank;
  double OutgoingLinks = 0;
  double DampingFactor = 0.85;
  double TempPageRank[] = new double[10];
  int ExternalNodeNumber;
  int InternalNodeNumber;
  int k = 1; // For Traversing
  int ITERATION_STEP = 1;
  InitialPageRank = 1 / totalNodes;
  System.out.printf(" Total Number of Nodes :" + totalNodes + "\t Initial PageRank  of All Nodes :" + InitialPageRank + "\n");

  // 0th ITERATION  _ OR _ INITIALIZATION PHASE //
  
  for (k = 1; k <= totalNodes; k++) {
   this.pagerank[k] = InitialPageRank;
  }

  System.out.printf("\n Initial PageRank Values , 0th Step \n");
  for (k = 1; k <= totalNodes; k++) {
   System.out.printf(" Page Rank of " + k + " is :\t" + this.pagerank[k] + "\n");
  }

  while (ITERATION_STEP <= 2) // Iterations
  {
   // Store the PageRank for All Nodes in Temporary Array 
   for (k = 1; k <= totalNodes; k++) {
    TempPageRank[k] = this.pagerank[k];
    this.pagerank[k] = 0;
   }

   for (InternalNodeNumber = 1; InternalNodeNumber <= totalNodes; InternalNodeNumber++) {
    for (ExternalNodeNumber = 1; ExternalNodeNumber <= totalNodes; ExternalNodeNumber++) {
     if (this.path[ExternalNodeNumber][InternalNodeNumber] == 1) {
      k = 1;
      OutgoingLinks = 0; // Count the Number of Outgoing Links for each ExternalNodeNumber
      while (k <= totalNodes) {
       if (this.path[ExternalNodeNumber][k] == 1) {
        OutgoingLinks = OutgoingLinks + 1; // Counter for Outgoing Links
       }
       k = k + 1;
      }
      // Calculate PageRank     
      this.pagerank[InternalNodeNumber] += TempPageRank[ExternalNodeNumber] * (1 / OutgoingLinks);
     }
    }
   }

   System.out.printf("\n After " + ITERATION_STEP + "th Step \n");

   for (k = 1; k <= totalNodes; k++)
    System.out.printf(" Page Rank of " + k + " is :\t" + this.pagerank[k] + "\n");

   ITERATION_STEP = ITERATION_STEP + 1;
  }
  // Add the Damping Factor to PageRank
  for (k = 1; k <= totalNodes; k++) {
   this.pagerank[k] = (1 - DampingFactor) + DampingFactor * this.pagerank[k];
  }

  // Display PageRank
  System.out.printf("\n Final Page Rank : \n");
  for (k = 1; k <= totalNodes; k++) {
   System.out.printf(" Page Rank of " + k + " is :\t" + this.pagerank[k] + "\n");
  }

 }
 
 public static void main(String args[]) {
  int nodes, i, j, cost;
  Scanner in = new Scanner(System.in);
  System.out.println("Enter the Number of WebPages \n");
  nodes = in .nextInt();
  PageRank p = new PageRank();
  System.out.println("Enter the Adjacency Matrix with 1->PATH & 0->NO PATH Between two WebPages: \n");
  for (i = 1; i <= nodes; i++)
   for (j = 1; j <= nodes; j++) {
    p.path[i][j] = in .nextInt();
    if (j == i)
     p.path[i][j] = 0;
   }
  p.calc(nodes);

 }
}
Please Click and Drag from the beginning to End of the above Source code for Selection and Copying.

To Compile and Run for above Example:

javac PageRank.java
java PageRank

Enter the Number of WebPages : 5
Enter the Adjacency Matrix with 1->PATH & 0->NO PATH Between two WebPages:

0 1 0 0 0
0 0 0 0 1
1 1 0 1 1
0 0 1 0 1
0 0 0 1 0

 Total Number of Nodes :5.0      Initial PageRank  of All Nodes :0.2

 Initial PageRank Values , 0th Step
 Page Rank of 1 is :    0.2
 Page Rank of 2 is :    0.2
 Page Rank of 3 is :    0.2
 Page Rank of 4 is :    0.2
 Page Rank of 5 is :    0.2

 After 1th Step
 Page Rank of 1 is :    0.05
 Page Rank of 2 is :    0.25
 Page Rank of 3 is :    0.1
 Page Rank of 4 is :    0.25
 Page Rank of 5 is :    0.35

 After 2th Step
 Page Rank of 1 is :    0.025
 Page Rank of 2 is :    0.07500000000000001
 Page Rank of 3 is :    0.125
 Page Rank of 4 is :    0.375
 Page Rank of 5 is :    0.4

 Final Page Rank  :
 Page Rank of 1 is :    0.17125
 Page Rank of 2 is :    0.21375000000000002
 Page Rank of 3 is :    0.25625000000000003
 Page Rank of 4 is :    0.46875
 Page Rank of 5 is :    0.49000000000000005

Note:
  • Final Page Rank Includes Damping Factor of 0.85 which is usually set between 0 and 1.
  • InternalNodeNumber represents the Node which you are currently calculating its PageRank.
  • ExternalNodeNumber represents the Nodes Other than InternalNodeNumber.


For every InternalNodeNumber check if there is any Incoming Links from ExternalNodeNumber if No - Ignore and move to next ExternalNodeNumber,If Yes - Count all the OutgoingLinks for that ExternalNodeNumber.

Finally Calculate Pagerank :
PR(InternalNodeNumber) += PR(ExternalNodeNumber)/All OutgoingLinks for ExternalNodeNumber

So from the above values , We have Webpage A(1) is the most important Page , Webpage B(2) and C(3) have almost equal importance with B(2) slightly more importance ,Webpage D(4) has some importance and Webpage E(5) has least importance.This helps to Rank Webpages in the Search results.

Please Note: Actual google Page rank Algorithm for large network of webpages grows logarithmic and slightly different from the one above. This Page Rank algorithm is fully owned by google inc and I just illustrated with a help of a Java Program to implement this Algorithm .I hope you enjoyed this .Thanks Have Nice Day.

Update1: New Example has been Added and Images are Updated.
Update2: I have Considered Damping Factor in my Implementation which is set to 0.85.
Update3:while(u<=2) Changed to while(ITERATION_STEP<=2).


12/13/15

Java Program to Implement Prim's Minimum Spanning Tree

A Spanning tree of a connected graph G is a acyclic subgraph of graph G that includes all vertices of G. A minimum spanning tree of connected graph G is a graph that consists of minimum weights or edge costs to reach each of the vertices . Start with any one vertex and grow the tree one vertex at a time to produce minimum spanning tree with least total weight or edge cost.We are using Prim's algorithm to find the minimum spanning tree .


Java Program to Implement Prim's Minimum Spanning Tree


Also Read :  Java Program to Implement Dijkstra's Shortest Path Algorithm


Take an Example for the Image below , We have four vertices a , b , c , d with their Cost weights are given in their edges.Source vertex is - Vertex 'a' which is marked.


First we write the Cost matrix as :

      1  2  3  4
 1   i   3  i   7
 2   3  i   4   2
 3   i   4   i   5
 4  7   2   5  i

The Minimum Spanning Tree for the above example is : 

a-->b : cost : 3
b-->d :  cost : 2
b-->c :  cost : 4

Among all edges of vertex a ,we need to find the least or minimum cost edge & mark that vertex then we go to the next vertex .Similarly find the minimum edge for the next vertex so on until we cover (travel) all vertices with minimum cost to form Minimum Spanning Tree. Greedy part of this Algorithm is to find the minimum cost edge and growing the tree dynamically.


Java Code to Implement Prim's Minimum Spanning Tree :


import java.util.*;
public class Prims
{
    public  int isVisited[] = new int[15];
    public  int cost[][] = new int[10][10];
    public int minimum_cost;
     
    public void calc(int n)
    {   
        int flag[] = new int[n+1];
        int i,j,min=999,num_edges=1,a=1,b=1,minpos_i=1,minpos_j=1;
         
        while(num_edges < n)
        {    
            
            for(i=1,min=999;i<=n;i++)
             for(j=1;j<=n;j++)
              if(this.cost[i][j]<min)
                if(this.isVisited[i]!=0)
                 {
                      min=this.cost[i][j];
                      a=minpos_i=i;
                      b=minpos_j=j;
                 }
 				if(this.isVisited[minpos_i]==0 || this.isVisited[minpos_j]==0)
             	{
  					  System.out.println("Edge Number \t"+num_edges+"\t from Vertex \t"+a+"\t  to Vertex \t"+b+"-mincost:"+min+" \n");
                      this.minimum_cost=this.minimum_cost+min;
        			  num_edges=num_edges+1; 
                      this.isVisited[b]=1;
                }
                   this.cost[a][b]=this.cost[b][a]=999;   
        
        
        }   
         
    }
    
    public static void main(String args[])
    {
        int nodes,i,j;
        Scanner in = new Scanner(System.in);
        System.out.println("Enter the Number of Nodes \n");
        nodes = in.nextInt();
        Prims p = new Prims();
        System.out.println("Enter the Cost Matrix Weights : \n");
        for(i=1;i<=nodes;i++)
          for(j=1;j<=nodes;j++)
          {
            p.cost[i][j]=in.nextInt();
            if(p.cost[i][j]==0)
              p.cost[i][j]=999;
          }
       
        p.isVisited[1]=1; // Initialization 
        p.calc(nodes);
  
         
    }   
}

Please Click and Drag from the beginning to End of the above Source code for Selection and Copying.

To Compile and Run :


javac Prims.java
java Prims

Enter the Number of Nodes : 4
Enter the Cost Matrix Weights :
0     3  999  7
3     0   4     2
999 4   0     5
7     2   5     0

Edge Number     1        from Vertex    1         to Vertex     2 -mincost:3

Edge Number     2        from Vertex    2         to Vertex     4 -mincost:2

Edge Number     3        from Vertex    2         to Vertex     3 -mincost:4


Prim's Minimum Spanning Tree containing Edges are numbered with its two vertices and minimum costs are shown in the Output above. 

Please Note : Once we Visit a node or an edge ,we make the cost 999 so that it should not visit that same node or an edge again . And also this.isVisited[] ,this.minimum_cost and this.cost[][] basically refers to current object p's isVisited Array ,Minimum_Cost and Cost matrix .Thanks and Enjoy Coding.

If you have any Comments please let me know by Commenting below .


Also Read :  Java Program to Implement Simple PageRank Algorithm


12/10/15

Java Program to Implement Dijkstra's Shortest Path Algorithm

Simple Java Program code to find the shortest path from single source using Dijkstra's Single Source Shortest Path Algorithm .It is similar to Prim's algorithm but we are calculating the shortest path from just a single source to all other remaining vertices using Matrix.In this Java Program first we input the number of nodes and cost matrix weights for the graph ,then we input the source vertex . After that we get the distance matrix using Calc() method . Finally we print the distance matrix which has shortest distance from source vertex.

Java Program to Implement Dijkstra's Shortest Path Algorithm


Also Read : How to Create Patch in Google Summer of Coding

Take an Example for the Image below , We have four vertices a , b , c , d with their Cost weights are given in their edges.Source vertex is : Vertex 'a' which is marked.

Java Program to Implement Dijkstra's Shortest Path Algorithm

First we write the Cost matrix as :

      1  2  3  4
 1   i   3  i   7
 2   3  i   4   2
 3   i   4   i   5
 4  7   2   5  i

Index position starts from 1 and ends at 4 . ( 1 to 4) and i stands for infinity or 999.We know that start or source vertex is 'a' or 1.So the distance array from 'a' to all other remaining vertices will be i , 3 , i , 7 .

First we find the smallest element and its position in the distance array i , 3 , i , 7 which will be 3 and using the position of smallest element 3 we find the other shortest possible available paths . So the distance matrix will updated to i , 3 , 7 , 7 . We repeat this same process to get remaining shortest paths available .

Java Program Code :


import java.util.*;
public class Dijkstra
{
 public  int distance[] = new int[10];
 public  int cost[][] = new int[10][10];
 
 public void calc(int n,int s)
 {
  int flag[] = new int[n+1];
  int i,minpos=1,k,c,minimum;
  
  for(i=1;i<=n;i++)
  {  
      flag[i]=0; 
      this.distance[i]=this.cost[s][i]; 
  }
  c=2;
  while(c<=n)
  {
   minimum=99;
   for(k=1;k<=n;k++)
   { 
          if(this.distance[k]<minimum && flag[k]!=1)
       {
        minimum=this.distance[i];
        minpos=k;
       }
      } 
            flag[minpos]=1;
      c++;
      for(k=1;k<=n;k++){
       if(this.distance[minpos]+this.cost[minpos][k] <  this.distance[k] && flag[k]!=1 )
       this.distance[k]=this.distance[minpos]+this.cost[minpos][k];
   }   
  } 
  
 }
 public static void main(String args[])
 {
  int nodes,source,i,j;
  Scanner in = new Scanner(System.in);
  System.out.println("Enter the Number of Nodes \n");
  nodes = in.nextInt();
  Dijkstra d = new Dijkstra();
  System.out.println("Enter the Cost Matrix Weights: \n");
        for(i=1;i<=nodes;i++)
          for(j=1;j<=nodes;j++)
          {
            d.cost[i][j]=in.nextInt();
            if(d.cost[i][j]==0)
              d.cost[i][j]=999;
          }
  System.out.println("Enter the Source Vertex :\n");
  source=in.nextInt();
  
  d.calc(nodes,source);
  System.out.println("The Shortest Path from Source \t"+source+"\t to all other vertices are : \n");
        for(i=1;i<=nodes;i++)
          if(i!=source)
  System.out.println("source :"+source+"\t destination :"+i+"\t MinCost is :"+d.distance[i]+"\t");
        
  
 } 
}


Please Click and Drag from the beginning to End of the above Source code for Selection and Copying.


To Compile and Run Java Program for the above Example :

javac Dijkstra.java
java Dijkstra

Enter the Number of Nodes :4
Enter the Cost Matrix Weights:
0      3   999   7
3      0    4      2
999  4    0      5
7      2    5      0
Enter the Source Vertex :
1
The Shortest Path from Source  Vertex  1  to all other vertices are :

source :1        destination :2   MinCost is :3
source :1        destination :3   MinCost is :7
source :1        destination :4   MinCost is :5

Please Note that this.distance[] and this.cost[][] basically refers to current object d's distance and Cost matrix .Thanks and Enjoy Coding.

If you have any Comments please let me know .


Also Read :  Java Program to Implement Prim's Minimum Spanning Tree


12/8/15

Java Program to Search Pattern using Horspool Algorithm

Horspool Algorithm is used to search the pattern in the given string using a shift table. Its another variation of the Boyer-Moore Algorithm where it uses two shift tables - bad shift table and good suffix table but in Horspool Algorithm we are using just one shift table to search the pattern in the given string.

Java Program to Search Pattern using Horspool Algorithm


What is Shift Table in Horspool Algorithm ?

A shift table is the table that contains two things : -
  1. Either length of the Pattern to be searched 
  2. Or distance of first occurrence of each character from the right most side of the pattern.
To know more about the Horspool Algorithm 


import java.util.*;
public class Horspool  {
  
   public static int SIZE=500;    
   public static int table[]=new int[SIZE];
  
public void shifttable(String pattern) {
 
 int i,j,m;
 char p[] = pattern.toCharArray();
 m=pattern.length();
 
 for (i=0;i<SIZE;i++)
    table[i]=m;
 for (j=0;j<m;j++)
    table[p[j]]=m-1-j;
}
public int horspool(String source,String pattern)
  {
      int i,k,pos,m;
      char s[] = source.toCharArray();
      char p[] = pattern.toCharArray();
      m=pattern.length();
     
      for(i=m-1;i<source.length();)
        {
           k=0;
            while((k<m) && (p[m-1-k] == s[i-k]))
              k++;
           if(k==m) 
     {   pos=i-m+2;
               return pos;
     } 
           else
               i+=table[s[i]];
        }
        return -1;
  } 
     public static void main(String []args){
        int pos; 
  String source=args[0];
        String pattern = args[1];
  
        Horspool  h = new Horspool ();
        
        h.shifttable(pattern);
        pos = h.horspool(source,pattern);
  
        if(pos == -1)
            System.out.println("PATTERN NOT FOUND");
        else
            System.out.println("PATTERN FOUND FROM POSITION: \t"+pos+"\n");
     }
}


Please Click and Drag from the beginning to End of the above Source code for Selection and Copying.

  To compile and run :

javac Horspool.java
java Horspool Testingstring ting

Output :   PATTERN FOUND FROM POSITION:    4


Please Note :
Testingstring is the source string and ting is the Pattern to be Searched both are given while running the Java Program and are accepted using args[0]=Source String and args[1]=Pattern to be Search in the program. You can change this if you want in the program .Thank you.

11/8/15

How to Extract the IP Address of the Visitor (Client) | PHP

To extract IP Address of any real Website visitor or client using PHP , We should have some basic idea about predefined variables that are used in PHP. The predefined variables in PHP are Superglobal , which means they are available in all scopes throughout a script. There is no need to do global $variable; to access them within functions or methods. Under this predefined variables we need look at $_SERVER['___'] variable to get IP Address . 


How to Extract the IP Address of the Visitor (Client) | PHP


$_SERVER is an array containing information such as headers, paths and script locations.The entries in this array are created by the web server .

You can get more details of $_SERVER : http://php.net/manual/en/reserved.variables.server.php

How to extract IP Address of the Visitor ?

IP address of the Client or user who viewed your Website can be got by using $_SERVER['REMOTE_ADDR'] . This will Print the IP Address of the Visitor (viewer) who requested the webpage to the Server . So when the request is made to the Server ,It stores the IP Address in $_Server Global variable which can be accessed using $_SERVER['REMOTE_ADDR'] variable .


<?php 
 $ipaddress = '';

if($_SERVER['REMOTE_ADDR'])
      $ipaddress = $_SERVER['REMOTE_ADDR'];

echo  "\n Your IP Address is :\t".$ipaddress;

?> 


You Can view the Demo here : Codispatch Demo

How to extract Real IP address if the Visitor is using Proxy Server ?

Some times visitor can spoof or hide the actual IP address that is assigned to that user and use Proxy Server address instead. This is commonly done using Hidemyass Proxy List  . Now we can't get the actual IP address of the visitor using PHP but we do can detect if it is Proxy Server or not, this is done by


<?php 
$realipaddress = '';

if ( $_SERVER['HTTP_X_FORWARDED_FOR'] || $_SERVER['HTTP_X_FORWARDED'] || $_SERVER['HTTP_FORWARDED_FOR'] || $_SERVER['HTTP_CLIENT_IP'] || $_SERVER['HTTP_VIA'] || in_array($_SERVER['REMOTE_PORT'], array(8080,80,6588,8000,3128,553,554)) || @fsockopen($_SERVER['REMOTE_ADDR'], 80, $errno, $errstr, 30))
{
     $realipaddress = "Proxy detected \t".$_SERVER['REMOTE_ADDR'];
  echo $realipaddress;
}
?> 


You can view the Demo here : Codispatch Demo

(Note that you must use or spoof some Proxy server address in-order to understand the above demo )

How to Extract the IP Address of the Visitor (Client) | PHP

Now you know how to extract the IP address of the Visitor even if the user is using Proxy Server .If you have any questions or suggestions please comment it below .

Also Read :  Login Password Protected Page using Sessions | PHP