Rancher Harvester is an open-source hyper-converged infrastructure platform designed to run modern cloud-native workloads on bare metal servers and it is completely open-source and free to use. Traditional Type 1 Hypervisors are complicated to set up on bare-metal hardware and it usually involves many storages, network, and other peripheral device configurations. We will cover on deploying rancher harvester on bare metal cloud instance and setting up your first virtual machine in rancher harvester. I am going to use vultr as a bare-metal cloud provider (Get $100 free vultr credit to setup your harvester cluster), you can use any cloud provider or you can even use your HomeLab/Self Hosted environments.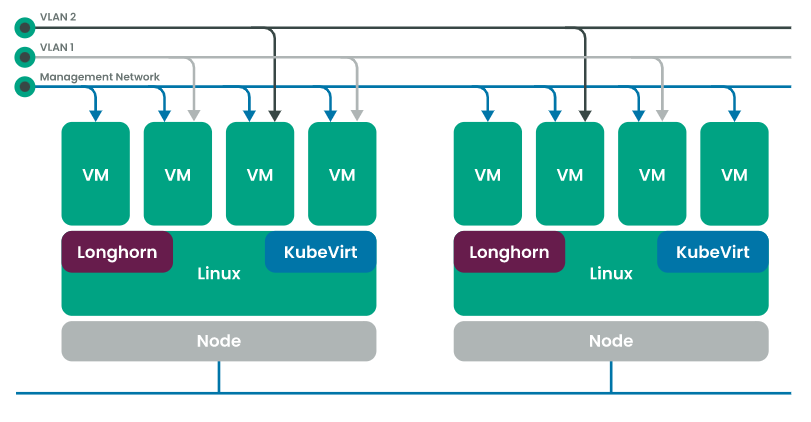


Enter the hostname and select Management NIC. You can also select Bond Mode and IPv4 method. I will leave it with default values. Press enter to continue. It will apply the network configurations.


Configuring SSH/import SSH key. You can import it if you have one or leave it empty and press enter.


Select Harvester v1.0.4 and press enter. You will be taken to the next screen which has the Rancher Harvester Management URL, IP address, and cluster state. Please be patient, it will initially show cluster state as Unavailable, Not Ready, Setting Up, etc. After giving a couple of minutes it should show you the below screen.


Rancher Harvester is built on top of Kubernetes using

Select bare metal cloud instance, select server location, select initial pre-installed OS, and select server size and disk configuration. You can enable IPv6 (optional) and add an SSH key. Give hostname to your instance. Click on deploy.

It will take a couple of minutes to provision and spin up your new server instance, So please be patient. I have selected a 2 * 240 GB SSD instance. So we will get two disk partitions /dev/sda and /dev/sdb. In /dev/sda (this has pre-installed Ubuntu 22.04 LTS OS running on it) and /dev/sdb which is formatted empty drive.


Run the below commands in your terminal. This will download the rancher harvester ISO image from Harvester Github Release and it will mount the ISO image as a harvester installer to our empty /dev/sdb drive and finally reboots the server. Your ssh terminal should get disconnected and you can close the terminal.
While the server boots up, click on View Console (right top monitor icon) in vultr management console. Next when seeing the below screen start hitting the F11 key on your keyboard to take you to the boot menu screen.
- Longhorn - lightweight, reliable, and easy-to-use distributed block storage system for Kubernetes.
- Elemental for openSUSE Leap 15.3 - Linux distribution designed to remove as much OS maintenance as possible in a Kubernetes cluster.
- KubeVirt - virtual machine management add-on for Kubernetes which leverages KVM and libvirt to allow running virtual machines inside of Kubernetes cluster.
Installation
Login to your vultr management console and click on deploy a new server.

Select bare metal cloud instance, select server location, select initial pre-installed OS, and select server size and disk configuration. You can enable IPv6 (optional) and add an SSH key. Give hostname to your instance. Click on deploy.


Click on the server instance, and you will find the server IP, username, and password. ssh into the server instance using the server username and server password which is given in the vultr server management console.

sudo apt update
wget https://releases.rancher.com/harvester/v1.0.2/harvester-v1.0.2-amd64.iso
umount /dev/sdb1
dd bs=1M conv=fdatasync if=./harvester-v1.0.2-amd64.iso of=/dev/sdb
reboot

You should see boot menu screen like below. This is the place where you can enter boot setup and change the boot order.

Select UEFI OS ( P3: Intel SSDSC2BB240G7 ) and press enter. (Basically, it means you are selecting to boot from /dev/sdb drive which has a harvester installer ISO image mounted on it)

Select Harvester Installer v1.0.2 and press enter. It will take a few minutes to boot the kernel and it should show you the below screen.

Select Create new harvester cluster. You can select join the existing harvester cluster if you already have the harvester cluster up and running.

Next, you get the option to choose the drive to install Harvester. We select sda 223.6G. Remember, We have two disk partitions /dev/sda and /dev/sdb. In /dev/sda (this has pre-installed Ubuntu 22.04 LTS OS running on it) and /dev/sdb we have a harvester installer (currently we booted from this). We are going to erase and remove Ubuntu OS from /dev/sda and install Harvester v1.0.4 in /dev/sda.

Enter the hostname and select Management NIC. You can also select Bond Mode and IPv4 method. I will leave it with default values. Press enter to continue. It will apply the network configurations.

It will ask for configuring DNS servers. I will leave it empty and press enter. (Optional step)

Next, it will ask for configuring Virtual Private IP. I am giving it as a static method and 172.168.0.102. This is an important and mandatory step and make sure this is done right. The VIP IP address you can use anything that you want to use to expose your application.

Enter your cluster token, this will be used when you are joining the existing harvester cluster.

Enter the password and confirm the password. Press enter to continue.

Configuring NTP server. Use the default value and press enter.

Configuring Proxy. Leave it empty and press enter.


Harvester remote configuration - You can add it if you have one or leave it empty and press enter.

Finally, it gives a summary and it will ask whether you want to erase and install the harvester. Select yes and press enter.

Installation should start. It will show you the installation progress. It will take a couple of minutes to complete the installation and finally, it automatically reboots the server.

When the server boots up, press the F11 key on your keyboard to take you to the boot menu screen and this time we are going to select UEFI OS ( P2: Intel SSDSC2BB240G7 ) and press enter. (Basically, it means you are selecting to boot from /dev/sda drive which has a harvester installed)


Congratulations, your Rancher Harvester cluster is Up. You can go to vultr public IP (vultr management console) from the new browser tab and you should be able to setup rancher harvester UCM first-time login screen. Set your new password and click on continue.


Wrapping Up
Thanks and congratulations on setting up your new harvester infrastructure. If you encountered any issues while setting up the cluster, please comment below. I have covered only the single node harvester setup process and will cover how to join existing harvester nodes to form a harvester cluster, Virtual Machine deployment, and Virtual Machine migration to a new harvester host/node in my upcoming posts. So stay tuned and happy developing infrastructure.


